Introduction to Zendesk integration

All-in-one Customer Experience tool for your Customer Support Team
Here’s what you’ll learn:
- Measure satisfaction with the support service upon the ticket resolution
- Measure satisfaction with the agent’s reply after individual interaction
- Measure customer effort or transactional NPS after the issue resolution
- Understand how effortless is the Help Center experience for your clients
Let’s look at the different ways you can distribute the surveys and gather the feedback:
The first thing you need to decide is what satisfaction metric you'd like to measure.
Nicereply offers three metrics:

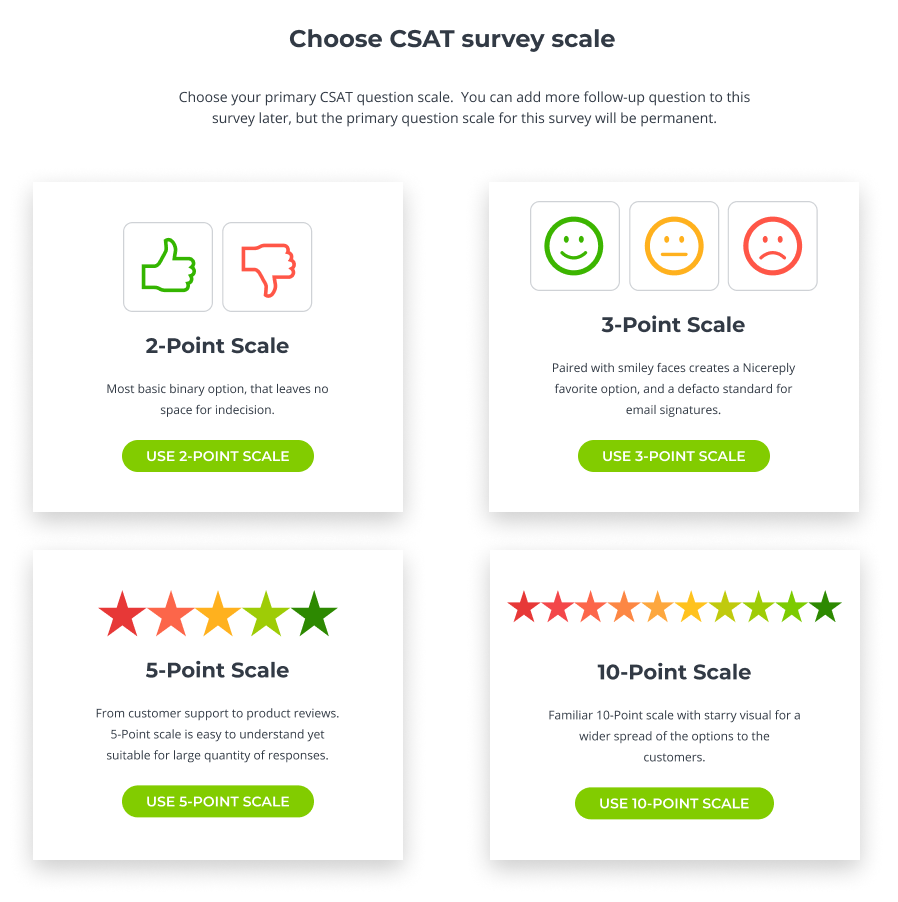
If you choose a CSAT survey, you can also choose the type of rating scale. See the examples below:


Once you have decided which metric to measure, you must determine which distribution option to use. You can measure customer satisfaction directly in your Zendesk signature (email template), via trigger, or after your chat conversation via the Nicereply chat plugin. You can also use website pop-ups or provide a rating at the end of your article or in your help center.
After you’ve decided what you want to measure, consider different ways you can collect feedback. We recommend using multiple surveys as more data equals more understanding and therefore, better customer support as well as customer success, right?
1. In-signature surveys embedded in Zendesk triggers or automation
Nicereply's in-signature surveys are short surveys included in the response of employees who communicate with customers. Recipients can easily click on a survey icon or button in the email signature to access the survey landing page and answer a few questions about their experience with your company.
If you choose an email template, copy the Nicereply survey code and insert it into your Zendesk email template. In doing so, customers will be able to rate your agents after each interaction, as the survey will be placed in their signature.
Here’s how you can set up your chosen metric in your email:
CSAT: Click here for the Customer Satisfaction Score email template setup guide
CES: Click here for the Customer Effort Score email template setup guide
NPS: Click here for the Net Promoter Score email template setup guide

2. E-mail Trigger
Another option for distributing your surveys is by using triggers, which are automated emails sent out usually after you close a ticket, conversation, chat, deal, etc. These triggers can be set up to scan the status of your tickets on a regular basis. A trigger is an action that is caused by an event in Zendesk, in this case, the resolution of a ticket. After a ticket is resolved, a survey is triggered by this event.
After a ticket is resolved, Nicereply will send an email survey to every customer with whom your company had a conversation.
You can customise the trigger behavior, such as the number of hours after ticket resolution when the survey is sent, the duration of time before the customer receives the same survey, or by using a tag. Check out more details in TRIGGER SETTINGS.
To fire a trigger after a conversation in Zendesk Chat or Zendesk Messaging, all that's required is:
- has a solved status
- has to have the same tag as in Nicereply (if you filter tickets by tag)
- has a valid customer's email

Set up the trigger for your chosen survey:
CSAT: Click here for the Customer Satisfaction Score trigger setup guide
CES: Click here for the Customer Effort Score trigger setup guide
NPS: Click here for the Net Promoter Score trigger setup guide


3. Post-chat survey sent by e-mail to the website visitor
Nicereply offers the ability to send surveys through a trigger in Zendesk Chat (Classic Web Widget) in addition to its integration with Zendesk Support. After ending a chat session, Nicereply will automatically email the chosen CSAT/CES/NPS survey to the customer with whom your agent had a conversation on your website.
Set it up with this article that will guide you through the same steps for CSAT, NPS, and CES, and demonstrate the steps using a CSAT example: CSAT/CES/NPS trigger distribution in Zendesk chat

4. Survey links in messaging, macros, or text messages
If you’re not keen on using previous ways of distributing your surveys to the customers, we got you!
Nicereply supports embedding the survey links into the messaging, macros, or text messages in Zendesk, The survey links can be included in the body of the message or as part of a macro, which is a pre-written response that can be quickly inserted into a message by the agent.
These survey links are often used to collect customer feedback after a support interaction or service request has been resolved. By including a survey link in a messaging conversation, the customer can quickly and easily provide feedback on their experience. The feedback can then be used by the company to measure customer satisfaction and make improvements to its customer support processes.
Click here for Nicereply Zendesk chat integration setup guide.
Click here to learn how you can set up Macros in Zendesk for surveys in an e-mail or in messages.
Click here to learn how to add a survey link to Zendesk text triggers
5. The embedded survey in the Help Center articles
Including an embedded survey at the end of an article in your help center can shed light on how your customers perceive it and whether the guides are as helpful as you anticipated.
This is important because it allows you to gather feedback from customers, measure customer satisfaction, track the effectiveness of your help center, and engage with customers.
We were aware of how useful such statistics could be for many help centers, and so we created a solution.
Here's the guide on how to add surveys to the Zendesk Guide.

6. Website pop-up survey triggered on the Help Center
Using website pop-up surveys on your website is the key as it helps businesses capture feedback, improve customer satisfaction, identify customer needs, increase engagement, and inform business decisions.
These types of surveys provide valuable insights into customer behavior and preferences. However, it's important to design surveys that are easy to complete and don't negatively impact the user experience.
A few things to keep in mind when creating website pop-up surveys:
- The pop-up should appear at an appropriate time, not immediately after the visitor lands on your website.
- Surveys should be relevant to the visitor's experience.
- Keep surveys short and easy to complete.
- Spend some time designing surveys so they are appealing to your customers.
- Make sure your website's pop-up survey is not intrusive or difficult to close.
If you’d like to try and collect the feedback using website pop-up, here’s how you can do it:


Features of the integration
Here’re the major features we’d like to present to you when you integrate Nicereply with Zendesk:
1. Push ratings & comment right to the ticket as a note
All ratings will be pushed to the relevant ticket in a form of note, as you can see in this screenshot:

You can enable/disable pushing of CSAT, CES or NPS ratings & comments as Note and Custom field into ticket in the survey Settings.

2. Save CSAT/CES/NPS rating in the custom ticket field
Beside the note, Nicereply will “automatically” set up the custom field and save CSAT/CES/NPS rating value – see left panel on following screenshot:
You can enable/disable push of CSAT rating value into ticket custom field in the survey settings.
3. Ticket backlink
Identify feedback in context with the direct link to the rated ticket.

4. Sync customers’ name to CSAT/CES/NPS ratings
Customers often don’t share their name in a rating form. Nicereply will automatically add customer names in the rating feed based on the ticket ID, so you don't need to use the name field on the survey.

5. Setup triggers based on CSAT/CES/NPS value
As we have our CSAT/CES/NPS value stored in the custom field, we can do some automation. E.g. we can set an alert tag to ticket with low/bad rating:

Having issues with your trigger survey? Read our article with FAQs related to trigger settings and trigger conditions for all integrations.
6. User import
Sync all your Zendesk users with Nicereply with one click. New users will get an automated email with login instructions.
7. Setup surveys for different brand
In survey settings, you can customise the survey however you like. If you like to, you can even add your company’s logo to it.
To do so, go to the setting of your chosen survey.
Click on the “Appearance”. Now you see a survey editor.

Look at the right side, and you’ll see a Company logo and underneath a button “Upload file”.
Pick the logo, you need et voilá, your survey has the logo of your company!


If you have multiple brands, you can create as many surveys as many brands you have. To distribute the branded surveys correctly, you will set up the filters by tag (e.g., brand tag) in the trigger settings of all your surveys in Nicereply. In doing so, we will send the dedicated surveys to the resolved ticket with the brand tag.

8. Setup surveys in different languages
We understand that not everybody needs and wants their survey in English and that’s ok. We got you!
Pick or create the survey, and then go to its settings and then to “Appearance”.
In your survey editor, you can choose the language of your liking. We are aware that the language selection is limited, but we covered the most used ones.
As you can see, on the right side, you have a roll-out for languages.
Pick the one you need, and it will automatically translate your survey to your preferred language.


To distribute surveys in different languages, you will create XY surveys in the needed languages in Nicereply. Then you set up the filters by tag (e.g., survey_it, survey_eng, survey_es) in the trigger settings of all your surveys in Nicereply. We recommend you create a trigger in Zendesk that adds a language tag to the ticket. In doing so, we will send the correct language version to the resolved ticket with the language tag.
