Introduction to Help Scout integration

Empower your Help Scout with Nicereply. In this article, you can find out everything important about Nicereply integration including:
- How the integration works
- Features of the integration
- Email template set up manuals
- Trigger set up manuals
How the integration works
The first thing you need to decide is what satisfaction metric you'd like to measure. Nicereply offers three metrics:

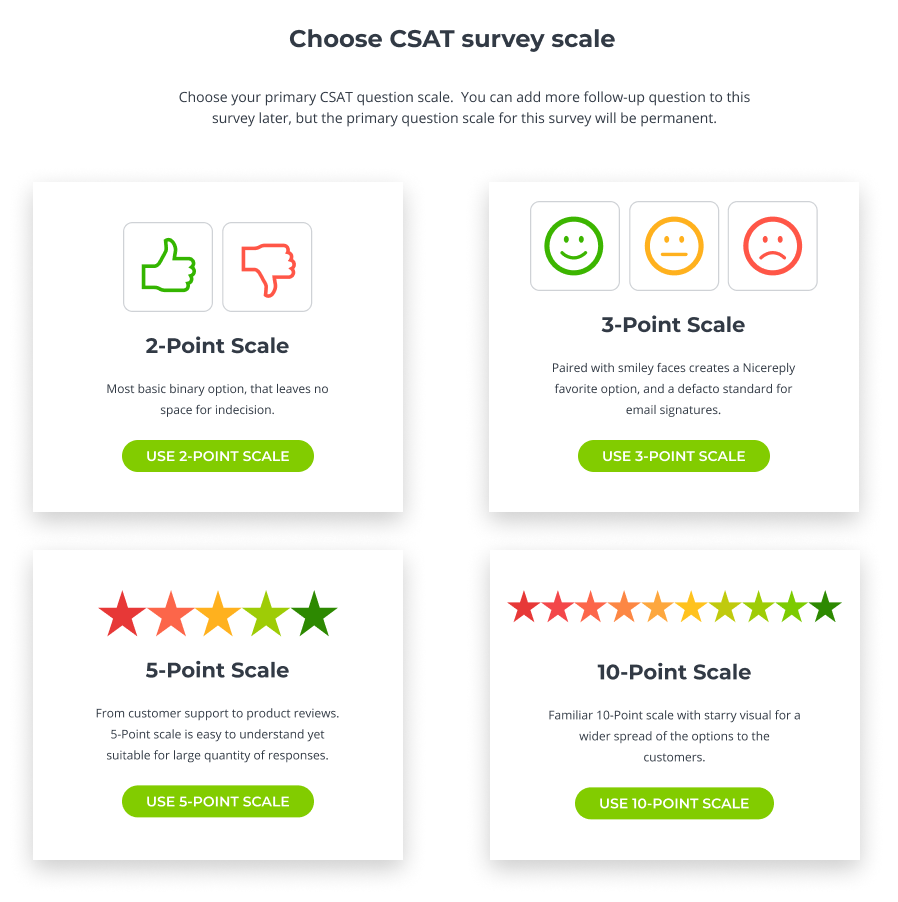
If you choose a CSAT survey, you can also choose the type of rating scale. See the examples below:


After you decide what metric you want to measure you need to decide which distribution option to use. You can either measure customer satisfaction directly in your Help Scout signature (email template), or via a trigger. Then connect your Help Scout account with Nicereply.
If you choose trigger distribution you set it up and Nicereply will start scanning the status of your tickets on a regular basis. The trigger is an action that is caused by an event in Help Scout - in this case, it is the resolution of a ticket. After a ticket is resolved a survey is triggered by this event.
Nicereply will send an e-mail survey to every customer your company solved a ticket with after it is resolved. You can edit the trigger behavior - for example, edit the number of hours since the resolution of the ticket after which the survey is sent.
If you choose an email template you copy the Nicereply survey code and insert it into your Help Scout email template. In this case, a customer will be able to rate your agents after each interaction because the survey will be placed in their signature.
Features of the integration
See the list of 7 major features of the integration between Help Scout and Nicereply.
1. Push ratings & comments right to the ticket as a note
All ratings will be pushed to the relevant ticket in a form of a note, as you can see at the bottom of this screenshot:

Note: you can enable/disable pushing of CSAT, CES or NPS ratings & comments as Note and Custom field into ticket in the survey Settings.
2. Save CSAT/CES/NPS rating value in the custom ticket field & custom tag
Besides the note, you can set up the custom field and save CSAT/CES/NPS rating value. Nicereply will automatically set up a custom Nicereply tag.
3. Ticket backlink
Identify feedback in context with the direct link to the rated ticket.

4. Sync customers’ names to CSAT/CES/NPS ratings
Customers often don’t share their names in a rating form. Nicereply will automatically add customer names in the rating feed based on the ticket ID, so you don't need to use the name field on the survey.

5. Setup triggers based on CSAT/CES/NPS value
As we have our CSAT/CES/NPS value stored in the custom field & tag, we can do some automation. E.g. we can set an alert tag to tickets with low/bad ratings.

6. User import
Sync all your Help Scout users with Nicereply with one click. New users will get an automated email with login instructions.
7. Customize your CSAT/CES/NPS surveys according to your branding and needs
Ask your customers the right question at the right time with branded one-click surveys. Customize your surveys and add additional questions.

Email template set up manuals
After you decide which satisfaction metric you want to measure, follow the respective manual to start gathering actionable feedback directly in your email template:
CSAT: Click here for the Customer Satisfaction Score email template setup guide
CES: Click here for the Customer Effort Score email template setup guide
NPS: Click here for the Net Promoter Score email template setup guide
Trigger set up manuals
After you decide which satisfaction metric you want to measure, follow the respective manual to start gathering actionable feedback via Nicereply trigger:
CSAT: Click here for the Customer Satisfaction Score trigger setup guide
CES: Click here for the Customer Effort Score trigger setup guide
NPS: Click here for the Net Promoter Score trigger setup guide