Distribute Customer Satisfaction Score (CSAT) in MailChimp - editing existing MailChimp Template

Distribute Nicereply surveys via your MailChimp campaigns and get actionable feedback. When using Nicereply survey in MailChimp you can:
- measure CSAT, CES 2.0 or Net Promoter Score with selected group of contacts via MailChimp campaigns
- see which content resonates - stop guessing what your customers like and dislike. Ask them for a feedback via one-click customer surveys directly in newsletters
- acquire new customers - analyse your customer feedback and get a clear picture of what your customers love about you. Use this to improve your value proposition, tweak your channels strategy clear up your messaging and more
- retain existing customers - loyal customers are worth up to 10 times their initial purchase value. See what's frustrating your customers and identify opportunities to improve your customer experience
How to start collecting Customer Satisfaction Score via MailChimp
Every step in the article is the same for CSAT, NPS and CES. Manual will show you steps with CSAT example.
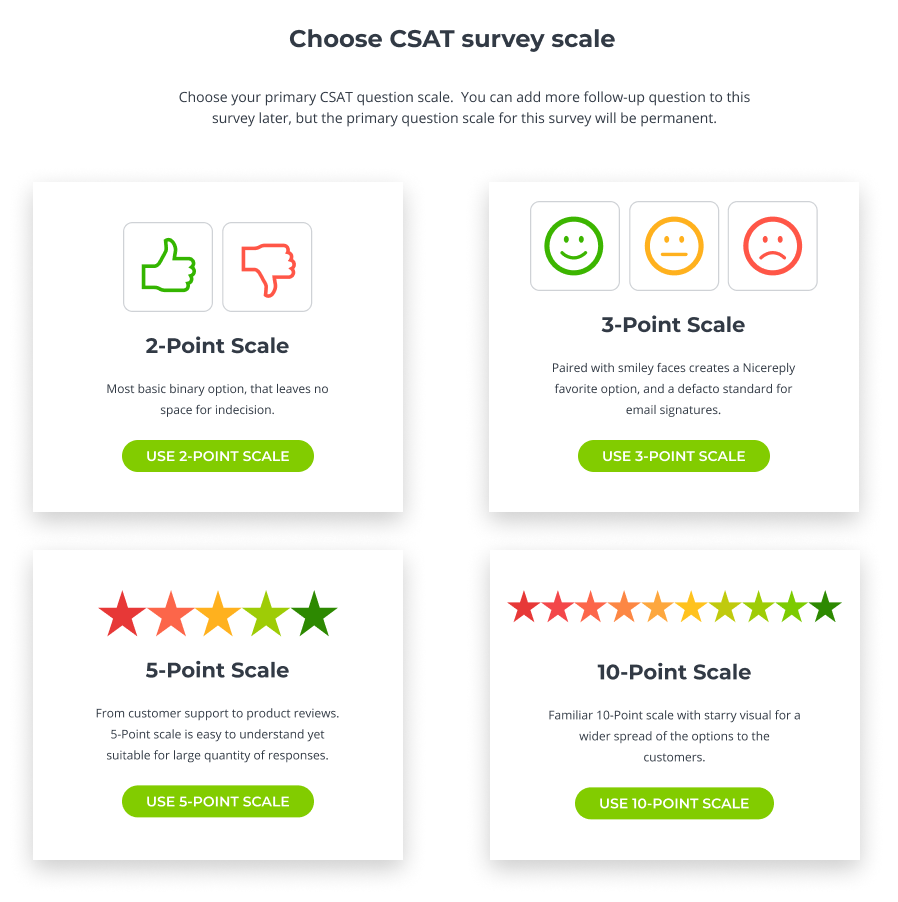
- Choose the customer satisfaction metric in the “left menu” in your Nicereply account, CSAT. Click on “START CSAT”. If you don't see this option click on NEW SURVEY button in the top left corner of the screen. Then, Choose your primary CSAT question rating scale. Once you choose the survey rating scale it is not possible to change it later.

- From distribution options choose “EMAIL TEMPLATE”
- You’re on the app directory page now, click on Mailchimp icon
- In the next step you have the option to add other users to your Nicereply account. New users will get an automated email with login instructions from us. Then click “CONTINUE”
- You're on the good way! To collect customer feedback, you need to place CSAT (smiley faces) into your MailChimp template. Now copy the smiley faces code

- Now go to your MailChimp account > Templates > choose the template you want to put Nicereply survey into
- Then, you will see content options to add to your template > choose Code and drag it into the email template section you want to have the survey in

- Now you will see the code editor in the right side of the screen. First, delete the predefined code
- Then paste the CSAT survey code you've copied in step number 5

- You can add another edits to Nicereply survey using HTML. For example, if you want to align the survey to the center add this code in front of the survey code: <div align="center">

- When you're done editing your template don't forget to click Save
- Then switch back to Nicereply and click Finish setup


PRO TIP: You can edit your survey by going to your Nicereply account > choose metric > surveys > and then click Appearance on the survey you want to edit. Here you can:
- edit the look of the survey
- edit the survey question
- add additional questions
- change the name of the survey to be able to identify it quickly (for example you can name it blog subscribers newsletter to know that the ratings come from your blog subscribers)
- insert company logo
- edit the rating scale etc.
WARNING: the survey code changes after each edit. After you edit the survey you need to copy the new code and paste it into the MailChimp (replace the old code with the new one). You can find the code in the surveys > click email template > click code.

Good job!
You've successfully integrated Nicereply survey into MailChimp. Your MailChimp template will now contain CSAT code (smiley faces) and all collected ratings will be stored in Nicereply under CSAT tab.